Compiling and Installing Custom PHP Modules in ServBay (macOS)
ServBay is a powerful local web development environment designed specifically for macOS, integrating a wide range of software stacks to meet the needs of modern web developers. It comes pre-installed with technologies such as PHP, Node.js, Python, Go, Java, databases (like MySQL, PostgreSQL, MongoDB), caches (Redis), and web servers (Caddy, Nginx, Apache), all with multi-version support so you can switch environments according to your project requirements.
While ServBay includes many commonly used PHP modules out of the box, in certain development scenarios you may need to compile and install additional PHP modules to extend PHP's capabilities or integrate with specific third-party services.
This guide provides a detailed walkthrough on how to compile and install custom modules for your PHP version within the ServBay environment. We'll use the popular imagick image processing module and the sqlsrv Microsoft SQL Server driver as real-world examples, detailing each step so you can seamlessly extend your PHP environment in ServBay.
Prerequisites
Important Notice
Before compiling any PHP module, the most critical step is to initialize your build environment and correctly set system environment variables as instructed by the official ServBay documentation. This foundation is vital for successfully compiling ServBay packages (including PHP modules). Failing to complete this step—or doing it incorrectly—will almost certainly lead to compilation failures, such as missing commands, libraries, or header files.
The ServBay build environment initialization script sets up necessary variables, such as PATH (pointing to ServBay's internal build tools), SERVBAY_PACKAGE_FULL_PATH (pointing to the ServBay package root directory), and CPU_NUMBER (used for multi-core compilation). These variables are essential for subsequent build commands.
For a step-by-step guide on how to initialize the ServBay build environment, see: Recompiling Packages with ServBay. Be sure you fully understand and strictly follow all instructions found there.
Before proceeding, double-check that you've successfully initialized the ServBay build environment and that all relevant environment variables are correctly set in your current terminal session.
Specifying the PHP Version
A key feature of ServBay is the ability to install and run multiple PHP versions on the same system. This flexibility allows developers to easily switch PHP environments for different projects. However, when compiling PHP modules, you must target a specific PHP version. The essential tools for preparing the build environment and retrieving configuration details, phpize and php-config, are tightly coupled to each PHP version.
phpize: This script prepares the PHP extension module build environment. It reads the module'sconfig.m4file and generates a standardconfigurescript, which is the starting point for building C/C++ software.php-config: This script provides detailed configuration information about the installed PHP version, including compiler flags, include directories, library paths, extension installation directories, and more. Theconfigurescript callsphp-configto ensure the module is built and linked against the correct PHP version.
Therefore, when running phpize, php-config, or other PHP build commands, you must specify the full path to the exact PHP version you want to compile the module for. For example, if you're compiling a module for PHP 8.3 in ServBay, use /Applications/ServBay/package/php/8.3/current/bin/phpize and /Applications/ServBay/package/php/8.3/current/bin/php-config. Choosing the correct version ensures your module is compatible with your target PHP environment and avoids build errors and runtime “symbol not found” issues.
Examples in this guide use PHP 8.3 from ServBay as a reference. Please replace the paths in each command with the actual installation path for your target PHP version.
Compiling the PHP imagick Module
The imagick module is a popular PHP extension that leverages the powerful ImageMagick library, providing a rich set of image processing functions. With imagick, you can perform scaling, cropping, format conversion, watermarking, composition, and many other complex image manipulations in PHP. Below are the detailed steps to compile and install the imagick module for a specific PHP version in ServBay:
Step 1: Install ImageMagick Dependencies
The imagick PHP module depends on the ImageMagick library being installed on your system. On macOS, it’s recommended to use Homebrew as the package manager. If you haven’t installed Homebrew yet, visit the official website for installation instructions.
Open a terminal and run:
brew install imagemagickStep 2: Retrieve imagick Module Source Code
Next, download the imagick module source package from the PHP Extension Community Library (PECL) website. Go to the PECL imagick page, find your desired version (usually the latest stable), and copy its download link. For example, with version 3.7.0:
wget https://pecl.php.net/get/imagick-3.7.0.tgzStep 3: Extract and Enter the Source Directory
Once downloaded, extract the source archive and move into its directory:
tar zxvf imagick-3.7.0.tgz
cd imagick-3.7.0Step 4: Prepare the Build Environment (phpize)
Inside the module’s source directory, use the phpize tool for your target PHP version to prepare for compilation. As mentioned earlier, always use the full path for the target PHP version. If you're compiling for PHP 8.3 and have set SERVBAY_PACKAGE_FULL_PATH:
${SERVBAY_PACKAGE_FULL_PATH}/php/8.3/current/bin/phpizeRunning phpize will generate the configure script and other necessary build files based on the module’s config.m4. You’ll see output confirming the build environment is ready.
Step 5: Configure Build Options
Run the configure script to set up compile options. You must specify the path to the target PHP version’s php-config with the --with-php-config argument:
./configure --with-php-config=${SERVBAY_PACKAGE_FULL_PATH}/php/8.3/current/bin/php-configThe script checks for dependencies like ImageMagick libraries and headers, and generates a Makefile for building. Errors here typically mean a missing dependency or incorrect path.
Step 6: Compile and Install the Module
Once configured, compile the module using make, then install it to PHP’s extension folder using make install. The ${CPU_NUMBER} variable (set during ServBay build environment initialization) enables parallel compilation:
make -j ${CPU_NUMBER}
make installmake install will automatically copy the compiled imagick.so to the correct extension directory for your PHP version in ServBay (e.g., /Applications/ServBay/package/php/8.3/current/lib/php/extensions/no-debug-non-zts-YYYYMMDD/, exact path varies by PHP version and build options).
Step 7: Enable the Module
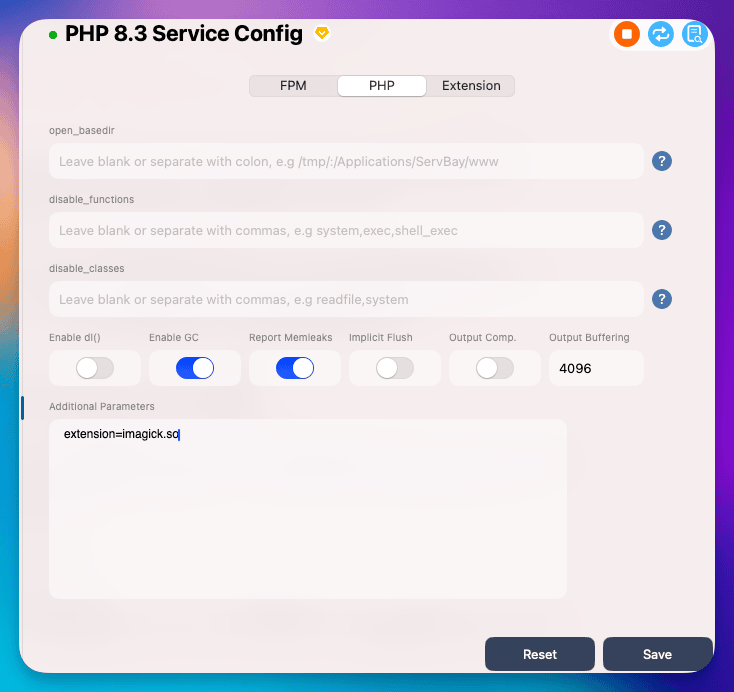
After installation, enable the module in the target PHP version’s configuration file. ServBay provides a visual interface for this:
- Open the ServBay app
- In the left menu, go to
Languages>PHP>PHP 8.3 - On the right, select the
PHPtab, scroll to the bottom, and under "Extra Parameters," enterextension=imagick.so - Click
Save; the PHP process will automatically restart and load the new module.

Step 8: Verify Module Loading
After enabling the module, restart the PHP package in ServBay for changes to take effect. You can either restart it from the ServBay management panel, or via the ServBay CLI (see the documentation for commands).
After restarting PHP, check from the command line whether imagick loaded successfully:
${SERVBAY_PACKAGE_FULL_PATH}/php/8.3/current/bin/php -m | grep imagickUsing $SERVBAY_PACKAGE_FULL_PATH/php/8.3/current/bin/php ensures you’re running the correct PHP version. The -m parameter lists all loaded PHP modules. If imagick loaded, you’ll see it in the output.
For a more detailed check, in your web root (usually /Applications/ServBay/www), create a file like info.php with:
<?php phpinfo(); ?>Then visit http://localhost/info.php or your ServBay site’s domain in a browser. Search for "imagick" in the output to confirm it’s enabled and view version/config info.
Compiling the PHP sqlsrv/pdo_sqlsrv Modules
The sqlsrv and pdo_sqlsrv modules are official PHP extensions for connecting to and working with Microsoft SQL Server. They depend on the Microsoft ODBC driver. If you need SQL Server connectivity in your PHP environment, you’ll need to compile and install these modules. Here’s how to do it in ServBay:
Note: Critical Prerequisites
To build and install sqlsrv on macOS, you MUST first install Microsoft’s SQL Server ODBC driver (msodbcsql18) and related CLI tools (mssql-tools18). These are not bundled with ServBay and must be installed manually.
We recommend Homebrew for installing these dependencies. If you don’t have Homebrew, visit brew.sh to install it.
Here’s how to install the Microsoft ODBC driver and tools. You may be prompted to accept a license (using the HOMEBREW_ACCEPT_EULA=Y env variable):
brew tap microsoft/mssql-release https://github.com/Microsoft/homebrew-mssql-release
brew update
HOMEBREW_ACCEPT_EULA=Y brew install msodbcsql18 mssql-tools18Ensure these dependencies are installed before attempting to build the sqlsrv module. They’re typically installed under /opt/homebrew/ (Apple Silicon Macs) or /usr/local/ (Intel Macs). You’ll need to reference these paths during compilation.
Tip
sqlsrv and pdo_sqlsrv are separate modules and must be compiled independently, but the steps are similar—sqlsrv is used in this example.
Step 1: Install Microsoft ODBC Driver and Tools
(As mentioned above, be sure you’ve used Homebrew to install msodbcsql18 and mssql-tools18 before proceeding.)
Step 2: Download the sqlsrv Module Source Code
Download the sqlsrv and pdo_sqlsrv modules from the PECL website. Go to the PECL sqlsrv page and copy download links for your required version (e.g., 5.12.0):
wget https://pecl.php.net/get/sqlsrv-5.12.0.tgz  # sqlsrv
wget https://pecl.php.net/get/pdo_sqlsrv-5.12.0.tgz # pdo_sqlsrvStep 3: Extract the Source and Enter the Directory
Extract the package and enter the module directory:
tar zxvf sqlsrv-5.12.0.tgz
cd sqlsrv-5.12.0

# Do the same for pdo_sqlsrv if needed; steps below use sqlsrv as an exampleStep 4: Prepare the Build Environment (phpize)
Inside the source directory, use the correct version of phpize:
${SERVBAY_PACKAGE_FULL_PATH}/php/8.3/current/bin/phpizeStep 5: Configure Build Options (with Dependency Paths)
Run the configure script. Since sqlsrv depends heavily on the Microsoft ODBC driver and unixODBC libraries installed via Homebrew, you need to set environment variables LDFLAGS and CPPFLAGS so the script can find relevant libraries and headers. Also, specify your target PHP version's php-config.
Adjust the Homebrew path below based on your system (Intel: /usr/local, Apple Silicon: /opt/homebrew). For example, if Homebrew is at /opt/homebrew:
export LDFLAGS="-L/opt/homebrew/lib ${LDFLAGS}"
export CPPFLAGS="-I/opt/homebrew/opt/unixodbc/include -I/opt/homebrew/include ${CPPFLAGS}" # Include /opt/homebrew/include to find all necessary headers
./configure --with-php-config=${SERVBAY_PACKAGE_FULL_PATH}/php/8.3/current/bin/php-configLDFLAGS: Tells the linker where to find libraries.-L/opt/homebrew/libspecifies the Homebrew default library path.CPPFLAGS: Directs the preprocessor to required header directories.-I/opt/homebrew/opt/unixodbc/includeis for unixODBC headers.-I/opt/homebrew/includecovers any additional headers.${CPPFLAGS}and${LDFLAGS}retain any extra flags already set by the ServBay build environment.
Step 6: Compile and Install the Module
With the Makefile generated, run:
make -j ${CPU_NUMBER}
make installThis will copy sqlsrv.so and pdo_sqlsrv.so (if both are built) into the correct extension directory for your PHP version in ServBay.
Step 7: Enable the Module
Once installed, enable the module in the target PHP version’s config. ServBay makes this easy in its visual interface:
- Open the ServBay app
- In the left menu, go to
Languages>PHP>PHP 8.3 - On the right, select the
PHPtab, scroll down, and under "Extra Parameters," enterextension=sqlsrv.soandextension=pdo_sqlsrv.so - Click
Save; ServBay will restart PHP and load the new modules.
Step 8: Verify Module Loading
After enabling, be sure to restart the PHP package for your changes to take effect.
After the restart, check with the following commands to confirm both modules are loaded:
${SERVBAY_PACKAGE_FULL_PATH}/php/8.3/current/bin/php -m | grep sqlsrv
${SERVBAY_PACKAGE_FULL_PATH}/php/8.3/current/bin/php -m | grep pdo_sqlsrvIf loaded, you'll see sqlsrv and pdo_sqlsrv in the output. As with imagick, you can also use phpinfo() to check detailed info.
Frequently Asked Questions (FAQ)
- Q: I get "Cannot find autoconf" or similar errors when compiling?
- A: This almost always means the ServBay build environment wasn’t properly initialized. Return to the “Prerequisites” section above and carefully follow the Recompiling Packages with ServBay documentation. Make sure necessary build tools (such as autoconf, automake, libtool, etc.) are installed and properly referenced via environment variables. Usually, running the initialization script and restarting your terminal will fix this.
- Q: The
configurescript fails, saying it can't find a library or header file?- A: This means a system library or header needed by the module is missing or not found.
- For
imagick, ensure the ImageMagick development libraries are installed:brew install imagemagick. - For
sqlsrv, double-check that you’ve installed Microsoft ODBC driver (msodbcsql18) andmssql-tools18with Homebrew. Before running./configure, ensure yourLDFLAGSandCPPFLAGSpoint to the Homebrew library/include directories (/opt/homebrew/lib,/opt/homebrew/opt/unixodbc/include). - Check that the ServBay build environment includes the Homebrew paths (if dependencies were installed via Homebrew), or manually add Homebrew’s
bindirectory to thePATHif needed.
- For
- A: This means a system library or header needed by the module is missing or not found.
- Q:
makeormake installfails?- A: Multiple reasons may cause this:
- Missing build dependencies: Check the error message for missing files or libraries and install as directed.
- Incorrect configuration: Ensure all parameters in the
configurestep are correct, especially the--with-php-configpath. - Permission issues:
make installcopies files into the ServBay installation directory. If the script didn’t set permissions correctly, you might get errors. Trysudo make install(with caution, and only if you understand the risks). - Corrupt source package: Download the module source again if you suspect corruption.
- A: Multiple reasons may cause this:
- Q: The
.somodule was generated, placed in the extension directory, and enabled in.ini, but it’s not listed inphp -morphpinfo()?- A:
- Most common cause: You didn’t restart the PHP package in ServBay. After editing the
.inifile, you must restart the target PHP package using ServBay’s management panel or CLI. Simply refreshing the browser or restarting the web server (like Caddy/Nginx) is not enough. .inifile syntax error: Check for typos or formatting mistakes in.ini(should beextension=modulename.so).- Incorrect extension directory: Make sure the
extension_dirinphp.inipoints to the right extension folder. You can verify withphp-config --extension-dir. - Incompatible or corrupt module: Recompile, ensuring you use a compatible source version and PHP version. Check the PHP log file (usually under the ServBay installation’s logs directory) for module load errors.
- Most common cause: You didn’t restart the PHP package in ServBay. After editing the
- A:
Summary
By following these detailed steps, you should be able to successfully compile and install custom PHP modules—like imagick and sqlsrv—within your ServBay macOS development environment. The most important points:
- Properly initialize the ServBay build environment: This is fundamental for all subsequent compilation operations.
- Use the correct PHP version paths: Always specify the full path to your target PHP version’s
phpizeandphp-config. - Manage external module dependencies: Install all necessary libraries and tools (such as ImageMagick, Microsoft ODBC) for the module, and ensure their paths are correctly set during
./configureusing environment variables likeLDFLAGSandCPPFLAGS. - Correctly enable the module: Edit or create
.inifiles under the target PHP version’sconf.ddirectory and addextension=modulename.so. - Restart the PHP package in ServBay: This ensures the new module configuration is loaded and active.
ServBay is a comprehensive local development platform with impressive flexibility for your workflows. Besides the PHP module compilation discussed here, ServBay offers full support for MySQL, PostgreSQL, MongoDB, Redis, Caddy, Nginx, Apache, Node.js, Python, Go, Java, .NET, Ruby, Rust, and more. Additional powerful features include real ACME SSL certificate application, easy CORS configuration, automated backups (including environments, sites, databases, and SSL certs), root password resets for databases, and built-in ServBay User CA and Public CA for local HTTPS development—all designed to help you build a fast, efficient, and feature-rich development workflow.
We hope this guide helps you add critical capabilities to your PHP environment in ServBay, streamlining your web development. For additional help, consult the official ServBay documentation or community support resources.