MySQL/MariaDB-Datenbanken mit phpMyAdmin in ServBay verwalten
Überblick: Was ist phpMyAdmin?
phpMyAdmin ist ein weit verbreitetes, quelloffenes Datenbankverwaltungswerkzeug, das speziell für die Verwaltung von MySQL- und MariaDB-Datenbanken über eine Weboberfläche entwickelt wurde. Für Webentwickler bietet es eine intuitive und benutzerfreundliche grafische Oberfläche, die die alltäglichen Verwaltungsaufgaben – wie das Anlegen von Datenbanken, Tabellen und Benutzern, das Ausführen von SQL-Abfragen sowie den Im- und Export von Daten – erheblich vereinfacht.
ServBay als leistungsstarke lokale Webentwicklungsumgebung hat phpMyAdmin bereits integriert, sodass Sie bequem die in ServBay laufenden MySQL- oder MariaDB-Instanzen verwalten können.
phpMyAdmin besticht durch folgende Vorteile:
- Umfangreiche Funktionen: Unterstützt die meisten Kernfunktionen von MySQL und MariaDB, darunter Verwaltung von Datenbanken, Tabellen, Feldern, Indizes und Benutzerrechten.
- Benutzerfreundlich: Übersichtlich gestaltete Benutzeroberfläche, die auch Einsteigern den schnellen Zugang ermöglicht.
- Mehrsprachigkeit: Unterstützung verschiedener Sprachen und damit für Nutzer weltweit geeignet.
- Erweiterbar: Funktionserweiterung durch Plugins oder Skripte möglich.
Mit phpMyAdmin können sich Entwickler ganz auf die Entwicklung der Anwendungslogik konzentrieren, ohne viel Zeit für Kommandozeilenoperationen aufwenden zu müssen.
Zugriff auf das integrierte phpMyAdmin von ServBay
ServBay enthält phpMyAdmin standardmäßig, Sie können es ganz einfach über die lokale ServBay-Adresse erreichen.
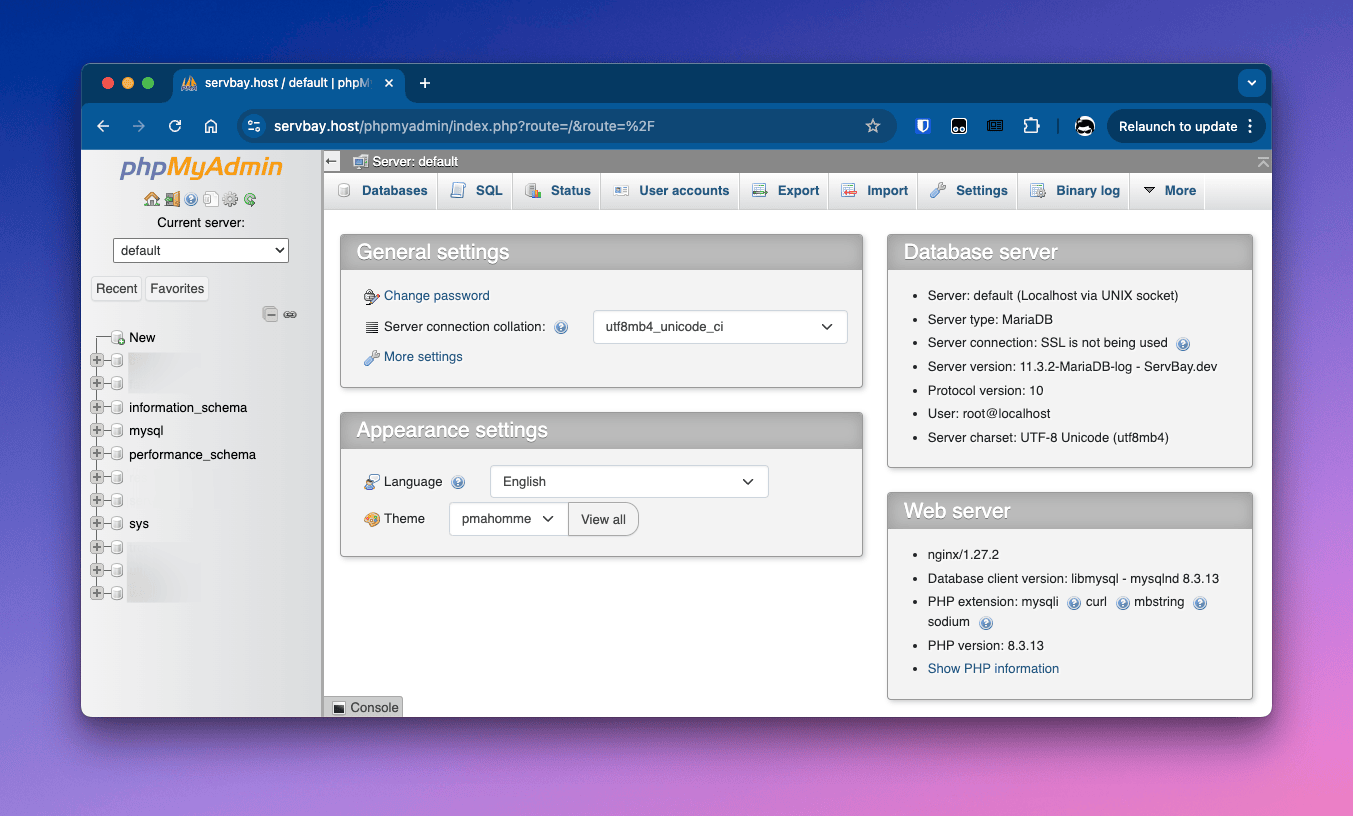
Während ServBay läuft, öffnen Sie Ihren Webbrowser und rufen folgende Adresse auf:
https://servbay.host/phpmyadmin
Beachten Sie, dass servbay.host der Standard-Hostname von ServBay ist, der durch den internen Caddy/Nginx-Server auf die Willkommensseite von ServBay und integrierte Tools wie phpMyAdmin verweist. Stellen Sie sicher, dass ServBay läuft und sowohl der Webserver (Caddy oder Nginx) als auch das Datenbankpaket (MySQL oder MariaDB) aktiviert sind.
Anmeldung bei phpMyAdmin
Um Ihre Datenbanken zu verwalten, müssen Sie sich mit den korrekten Zugangsdaten bei phpMyAdmin anmelden.
- Browser öffnen: Rufen Sie die URL von phpMyAdmin auf:
https://servbay.host/phpmyadmin - Verbindungsdaten eingeben: Auf der Login-Seite geben Sie Ihren Benutzernamen und Ihr Passwort ein.
- Benutzername und Passwort: Die Standardzugangsdaten für die Datenbanknutzer (in der Regel
root) und das dazugehörige Passwort finden Sie im ServBay-Interface unter dem Tab Datenbanken (Databases). Aus Sicherheitsgründen wird empfohlen, das Standard-root-Passwort nach erstmaliger Nutzung zu ändern. - Server: Hier geben Sie meist
defaultein oder wählen explizit die gewünschte Datenbankversion (z. B.MariaDB-10.6oderMySQL-8.0).defaultverweist in der Regel auf die aktuell aktivierte Datenbankversion in ServBay.
- Benutzername und Passwort: Die Standardzugangsdaten für die Datenbanknutzer (in der Regel
- Anmelden: Klicken Sie auf „Anmelden“, um das phpMyAdmin-Interface zu betreten.
ServBay-Datenbanken mit phpMyAdmin verwalten
Nach dem erfolgreichen Login können Sie im grafischen Interface von phpMyAdmin verschiedene Verwaltungsaufgaben durchführen. Zu den typischen Arbeitsschritten zählen:
Neue Datenbank erstellen
Für ein neues Projekt legen Sie in der Regel eine eigene Datenbank an.
- Klicken Sie in der Navigation links auf Neu oder in der Mitte der Seite auf den Tab Datenbanken.
- Im Bereich „Datenbank anlegen“ geben Sie den gewünschten Datenbanknamen ein (z. B.
servbay_project_db). - Wählen Sie im Dropdown für Kollation den passenden Zeichensatz und die Sortierung,
utf8mb4_unicode_ciwird empfohlen, da damit ein breites Zeichenspektrum (einschließlich Emojis) abgedeckt wird. - Klicken Sie auf Anlegen.
Neue Tabelle erstellen
Nachdem die Datenbank angelegt wurde, können Sie die Tabellenstruktur festlegen.
- Klicken Sie in der linken Navigation auf den gerade erstellten Datenbanknamen.
- In der Strukturansicht der Datenbank finden Sie den Bereich „Tabelle erstellen“.
- Geben Sie einen Tabellennamen ein (z. B.
users) sowie die benötigte Anzahl Felder. - Klicken Sie auf Anlegen.
- Auf der nächsten Seite definieren Sie für jedes Feld die Eigenschaften, darunter:
- Name: Feldname (z. B.
id,username,email,created_at). - Typ: Datentyp (z. B.
INT,VARCHAR,TEXT,DATETIME). - Länge/Wert: Die Feldlänge entsprechend dem Datentyp angeben (z. B.
VARCHAR(255)). - Standardwert: Optional einen Standardwert festlegen.
- Index: Legen Sie Primärschlüssel (PRIMARY), eindeutige Schlüssel (UNIQUE), Indexe (INDEX) etc. fest. Für das
id-Feld sind PRIMARY und AUTO_INCREMENT üblich. - A_I: Aktivieren Sie das automatische Hochzählen für das Feld (meist für den Primärschlüssel).
- Name: Feldname (z. B.
- Nach Definition aller Felder scrollen Sie nach unten und klicken auf Speichern.
Daten einfügen
Neue Einträge zur Tabelle hinzufügen.
- Wählen Sie in der linken Navigation die Ziel-Tabelle aus.
- Klicken Sie in der oberen Menüleiste auf Einfügen.
- Geben Sie die Daten für die neuen Einträge ein. Mehrere Zeilen können gleichzeitig eingefügt werden.
- Klicken Sie unten auf OK oder Ausführen.
Daten abfragen und durchsuchen
Daten anzeigen oder benutzerdefinierte Abfragen ausführen.
- Wählen Sie in der linken Navigation die gewünschte Tabelle aus.
- Klicken Sie oben auf den Tab Durchsuchen, um die ersten Zeilen der Tabelle anzuzeigen.
- Für komplexere Abfragen wechseln Sie auf den Tab SQL, geben Ihre SQL-Anweisung ein (z. B.
SELECT * FROM users WHERE username = 'servbay-demo';) und klicken auf OK oder Ausführen.
Daten aktualisieren
Vorhandene Einträge ändern.
- Wählen Sie die gewünschte Tabelle in der linken Navigation.
- Klicken Sie auf Durchsuchen und suchen Sie die gewünschte Datenzeile.
- Klicken Sie in der gewünschten Zeile auf das Bearbeiten-Symbol (in der Regel ein Bleistift).
- Passen Sie die Werte an.
- Klicken Sie unten auf OK oder Ausführen, um die Änderungen zu speichern.
Daten löschen
Einträge aus der Tabelle entfernen.
- Wählen Sie in der Navigation links die entsprechende Tabelle.
- Über Durchsuchen finden Sie die zu löschenden Zeilen.
- Kreuzen Sie die Checkbox links neben der gewünschten Zeile an.
- Für mehrere Zeilen können Sie diese ebenfalls markieren und gebündelt löschen.
- Klicken Sie neben der Zeile auf das Löschen-Symbol (meist ein Kreuz) oder wählen Sie bei mehreren markierten Zeilen unten die Aktion Löschen und klicken Sie auf OK oder Ausführen.
- Bestätigen Sie den Löschvorgang.
Tabelle löschen
Eine komplette Tabelle samt aller Einträge entfernen.
- In der linken Navigation wählen Sie die Datenbank, die die zu löschende Tabelle enthält.
- In der Strukturansicht suchen Sie die entsprechende Tabelle.
- Kreuzen Sie die Checkbox links von der Tabelle an.
- Im unteren Bereich der Tabellenliste wählen Sie Löschen und klicken auf OK oder Ausführen.
- Löschen bestätigen. Achtung: Das Löschen der Tabelle entfernt unwiderruflich alle enthaltenen Daten.
Datenbank löschen
Eine komplette Datenbank mit allen Tabellen und Daten entfernen.
- Wählen Sie links die gewünschte Datenbank aus.
- Klicken Sie oben auf den Tab Operationen.
- Scrollen Sie nach unten zum Bereich „Datenbank löschen (Drop the database)“ und klicken Sie auf Datenbank löschen.
- Bestätigen Sie die Aktion. Achtung: Das Löschen der Datenbank ist nicht rückgängig zu machen und entfernt alle Daten dauerhaft.
Häufig gestellte Fragen (FAQ)
- Frage: Warum kann ich
https://servbay.host/phpmyadminnicht aufrufen?- Antwort: Stellen Sie sicher, dass ServBay läuft und sowohl der Webserver (Caddy oder Nginx) als auch das gewünschte Datenbankpaket (MySQL oder MariaDB) im ServBay-Panel aktiviert sind. Prüfen Sie außerdem, ob die hosts-Datei Ihres Systems keine Änderungen von Drittprogrammen erfahren hat, oder starten Sie ServBay neu.
- Frage: Wo finde ich den Benutzernamen und das Passwort für die Datenbank?
- Antwort: Das Standard-Root-Passwort finden Sie im Tab Datenbanken (Databases) im ServBay-Interface. Lesen Sie dazu auch den Artikel Root-Datenbankzugangsdaten und Verbindungsinformationen abrufen
- Frage: Was tun, wenn ich das root-Passwort der Datenbank vergessen habe?
- Antwort: ServBay bietet eine Funktion zum Zurücksetzen des root-Passworts. Im Tab Datenbanken (Databases) finden Sie den Button zum Zurücksetzen. Mit einem Klick wird für die gewählte Datenbank (MySQL oder MariaDB) ein neues Standard-root-Passwort erzeugt und angezeigt.
- Frage: Unterstützt phpMyAdmin die Anbindung von PostgreSQL oder MongoDB in ServBay?
- Antwort: phpMyAdmin ist ausschließlich für MySQL und MariaDB ausgelegt und unterstützt weder PostgreSQL noch MongoDB.
Fazit
Mit dem in ServBay integrierten phpMyAdmin können Sie Ihre MySQL- und MariaDB-Datenbanken in der lokalen Entwicklungsumgebung schnell, effizient und intuitiv verwalten. Von simplen Erstellungen und Löschungen bis zum Einfügen, Abfragen, Aktualisieren und Entfernen von Daten vereinfacht die grafische Oberfläche den gesamten Verwaltungsprozess erheblich. In Kombination mit den komfortablen Verwaltungsfunktionen von ServBay gelingt Ihnen Webentwicklung und Debugging noch reibungsloser.